スタートページ> Javascript> SVG>
HTMLのsvg要素内で図形を表示できます。
下のように svg要素内に、直線(line)や長方形(rect)などの子要素を記述すると、svg要素は右図のようになります。
<svg width="400" height="400" class="svgcss">
    <line x1="50" y1="10" x2="200" y2="50" stroke="red" /> <!-- 赤直線 -->
    <line x1="50" y1="50" x2="300" y2="80" stroke="blue" stroke-width="2" stroke-dasharray="15, 5"/> <!-- 青破線 -->
    <rect x="50" y="100" width="80" height="50" /> <!-- 長方形、オプションなし -->
    <rect x="150" y="100" width="80" height="50" fill="red" /> <!-- 長方形、赤塗りつぶし -->
    <rect x="250" y="100" width="80" height="50" stroke="blue" fill="transparent" rx="10" ry="10" />
     <!-- 長方形、青枠、塗りつぶしなし 角を丸くする-->
    <circle cx="100" cy="200" r="30" stroke="blue" stroke-width="4" fill="yellow" /> <!-- 円 -->
    <ellipse cx="250" cy="200" rx="50" ry="30" stroke="red" stroke-width="4" fill="transparent" /> <!-- 楕円 -->
    <polyline points="50,250,  100,300, 150,250, 200,300" stroke="green" stroke-width="4" /> <!-- 緑連続直線 -->
    <polyline points="230,250,  280,300, 330,250, 380,300" stroke="green" stroke-width="4" fill="transparent" /> <!-- 同上 塗りつぶしなし -->
    <polygon points="50,350,  100,320, 150,380" stroke="red" stroke-width="4" /> <!-- 赤多角形 -->
    <polygon points="230,350,  280,320, 330,380" stroke="blue" stroke-width="4" fill="transparent" /> <!-- 同上 塗りつぶしなし -->
</svg>
<svg width="横幅" height="縦幅" … > // img や cambas などと同じ
: // ここに <line ~ /> や <rect ~ /> などを記述 /> で閉じること
: // 複数の同じタイプの図形(<line ~ など)があってもかまいません
: // これらは svg 要素の子要素の位置づけになります。
</svg>
svg要素の中で、実際に図形を表示する領域を指定します。
<svg width="100" height="100" viewBox="20,30, 30,50" >
 <svg width="100" height="100" viewBox="0,0, 100, 100" class="svgcss">
  <rect x="0" y="0" width="50" height="50" fill="red" />
  <circle cx="75" cy="75" r="25" fill="green" />
  <line x1="0" y1="0" x2="100" y2="100" stroke="blue" stroke-width="6" />
 </svg>
(省略時) 0,0, 100,100 |
x, y 変更
10,20, 100,100
|
x, y 変更
-10,-20, 100,100
|
幅変更
0,0, 80,80
|
幅変更
0,0, 120,120
|
縦横比変更
0,0, 200,100
|
縦横比変更
0,0, 100,200
|
通常は図形の縦横比は保たれていますが、
<svg … preserveAspectRatio="none" …>
とすることにより、viewBoxのwidth, height による縦横比が優先します。
省略時 0,0, 100,100 |
縦横比変更
0,0, 200,100
|
縦横比変更
0,0, 100,200
|
直線 line
<line x1="始点X" y1="始点Y" x2="終点X" y2="終点Y" … … />
長方形 rect
<rect x="始点X" y="始点Y" width="横幅" height="縦幅" … … />
rx, ry :角を丸くする
連続直線 polyline
<polyline points="x1,y1, x2, y2, x3, y3, …" … … /> // 端点全体を "" で囲む
fill="transparent" を与えないと開始点と終点とを結んだ多角形とされ塗りつぶされる
多角形 polygon
<polygon points="x1,y1, x2, y2, x3, y3, …" … … /> // 端点全体を "" で囲む
円 circle
<circle cx="中心点X" cy="中心点Y" r="半径" … … />
楕円 ellipse
<ellipse cx="中心点X" cy="中心点Y" rx="横半径" ry="縦半径" … … />
id="一意名称" // JavaScript でこの図形を参照するときに必要
display="none" // 作成した図形を非表示にする
style="" // インラインCSSを書き込めます style="fill:red; stroke:blue" など
stroke="線色" // 省略値="black"。 "#000", "000000"
stroke-opacity="透明度" // 省略値=1, 0とすると線が見えなくなる
stroke-width="線幅" // 省略値=1(px) em、ex、px、pt、pc、cm、mm、in
stroke-dasharray="破線" // "3"(点線)、"15, 5"(破線)、"3, 3, 15, 3"(一点鎖線)
stroke-linecap="線端形状" // butt(平ら、省略値)、round(丸)、square(四角)
stroke-linejoin="頂点形状" // miter(鋭角、省略値)、round(丸)、bevel(面取り)
fill="塗りつぶし色" // 省略すると黒色で塗りつぶされる。塗りつぶさないなら "transparent" (塗りつぶしを透明化)とする。
fill-opacity="内部透明度"
opacity="全体の透明度"
transform="図形変形"
// "matrix(a,b,c,d,e,f)" 変換行列による変形
// "translate(tx, ty)" 平行移動
// "scale(sx,sy)" 拡大・縮小
// "rotate(angle)" 回転
// "skewX(angle)" 横方向の傾斜
// "skewY(angle)" 縦方向の傾斜
一般形式
<text x="位置X" y="位置Y" … … >文字列</text>
パラメタ
transform = "rotation(回転角度 中心x座標 中心y座標)"
text-anchor="左右揃え" // "start"(左端揃え), "middle"(中央揃え), "end"(右端揃え)
font-family="フォントの種類"
font-size="文字サイズ"
font-weight="フォント太さ" // "normal", "bold", "bolder", "lighter"
font-style="フォントの形状" // "normal", "italic", "oblique"
writing-mode="横・縦書き" // "lr"(横書き), "tb"(縦書き)
glyph-orientation-vertical="縦書き時の角度" // 0. 90, 180, 270
glyph-orientation-holizontal="横書き時の角度" // 0. 90, 180, 270
width="文字列全体の幅"
パスは、多様な線や図形を表現できる機能をもちます。
それを一つのパラメタ d で記述するので、かなり複雑になります。
<path d="記号 x y" … … />
記号とxの間の空白はあってもなくてもよい
xとyの間は空白でも「,」でもよい
M x y : Move to(x, y に移動)
L x y : Line to (x, y に線を引く)
H x : Horizontal lineto(水平方向に線を引く)
V y : Vertical lineto(垂直方向に線を引く)
C x1 y1 x2 y2 x y: Curve to(制御点1(x1, y1)、制御点2(x2, y2)、終点(x, y) とする三次ベジェ曲線)
S x2 y2 x y : Shorhand/smooth curveto(制御点(x1, y1)、終点(x, y) とする三次ベジェ曲線)
Q x1 y1 x y : quadratic Bézier curve(制御点(x1, y1)、終点(x, y) とする二次ベジェ曲線)
T x y : smooth quadratic Bézier curveto(制御点(x1, y1)、終点(x, y) とする滑らかな二次ベジェ曲線)
A パラメタは後述 : 円弧
Z : Close path(パスを閉じる)
記号が大文字のときは絶対座標、小文字のときは相対位置を示します。次の二つは同じ図形になります。
ここでは、大文字を用います。
|
<path d="M 10 50 |
<path d="m 10 50 |
|
オプションなし |
stroke="red" |
d=" … Z"(Zを追加) |
fill="yellow" |
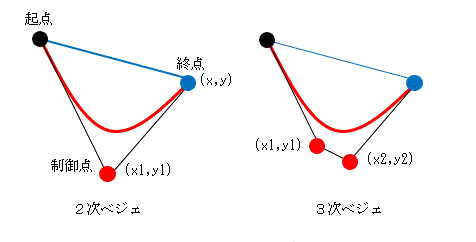
ベジェ曲線(Bezier Curve)について簡単に説明します(右図)。
始点(黒点)と終点(青点)(x,y) を結ぶには、単純には青の直線になりますが、それを赤のような曲線にする方法です。数式を無視して感覚的にいえば、適当に制御点(赤点)を定めて、そこから青線を引っ張るような操作になります。
制御点が一つ (x1,y1) のときを2次、2つ (x1,y1) と(x2,y2) のときを3次のベジェ曲線といいます。
d="… Q x1 y1 x y … " のように与えますが、これには始点がありません。始点は M x y など直前の処理での最終座標になります。
ここでは、Q と C だけを扱います。
|
<path d="M 20 10 起点 |
stroke="red" |
<path d="M 20 10 起点 |
パラメタの構成
A rx ry ; X軸・Y軸半径
start ; X軸との角度
Large Arc Sweep Flag : 円弧が 180 度より大きい=1,小さい=0
Sweep Flag : 反時計回り=0, 時計回り=1
x y : 円弧終点(開始点はx1,y1(M などで与える)
起点と終点の2点を通る円弧は4通りあります。それをLarge Arc Sweep FlagとSweep Flagで決定します。
|
%lt;path d="M 125 50 起点 |
Large Arc Sweep Flag=1 |
Large Arc Sweep Flag=0 |
Large Arc Sweep Flag=1 |
終点を(75,80)に変えてみます。
|
Large Arc Sweep Flag=0 |
Large Arc Sweep Flag=1 |
Large Arc Sweep Flag=0 |
Large Arc Sweep Flag=1 |
複数の図形をグループ化します。
  <svg ~>
   <g>
    <rect x="5" y="5" width="40" height="40" stroke="blue" stroke-width="4" fill="transparent"/>
    <circle cx="40" cy="25" r="20"  stroke="blue" stroke-width="4" fill="transparent"/>
   </g>
  </svg>
同一グループの図形に共通のパラメタ設定ができます(下左図)
  <svg ~>
   <g stroke="blue" stroke-width="4" fill="transparent">
    <rect x="50" y="50" width="40" height="40"/>
    <circle cx="20" cy="50" r="25"/>
   </g>
  </svg>
グループ全体を変形できます(下右図)
<g stroke="blue" stroke-width="4" fill="transparent" transform="rotate(30,50,50)">
単純なケース
  <svg width="400" height="50" class="svgcss">
   <rect x="5" y="5" width="40" height="40" stroke="blue" stroke-width="4" fill="transparent" ">

    <animate
      attributeName="x"  対象となる属性
      from="0" to="400"  "x" の開始位置と終了位置
      dur="5"            開始-終了までの実行時間
      repeatCount="2"    開始-終了の打切り回数。"indefinite"=無限回。省略値="1"
    />

   </rect">
 </svg">
複数のanimateの組合せ
  <animate attributeName="x" from="0" to="400" dur="5" repeatCount="2" />
  <animate attributeName="fill" from="red" to="yellow" dur="2" repeatCount="5" />
複数の図形のanimate
 <svg width="100" height="100" class="svgcss">
  <circle cx="50" cy="50" r="0" stroke="red" stroke-width="4" fill="transparent" >
   <animate attributeName="r" from="0" to="50" dur="5" repeatCount="2" />
  </circle>
  <circle cx="50" cy="50" r="50" stroke="blue" stroke-width="4" fill="transparent" >
   <animate attributeName="r" from="50" to="0" dur="5" repeatCount="2" />
  </circle>
 </svg>
通常では、<a href="URL">クリック要素</a> とするところ、svg 要素では
、
  <a xlink:href="URL">
    <circle ~ />  クリックされる図形
  &li;/a>
のようにします。右図の青丸をクリックすればリンクするが、白地の部分では何も起こりません。